How to Install a DC Isolator Switch the Right Way?

Time:2026-05-09 Author:Isabella
0%

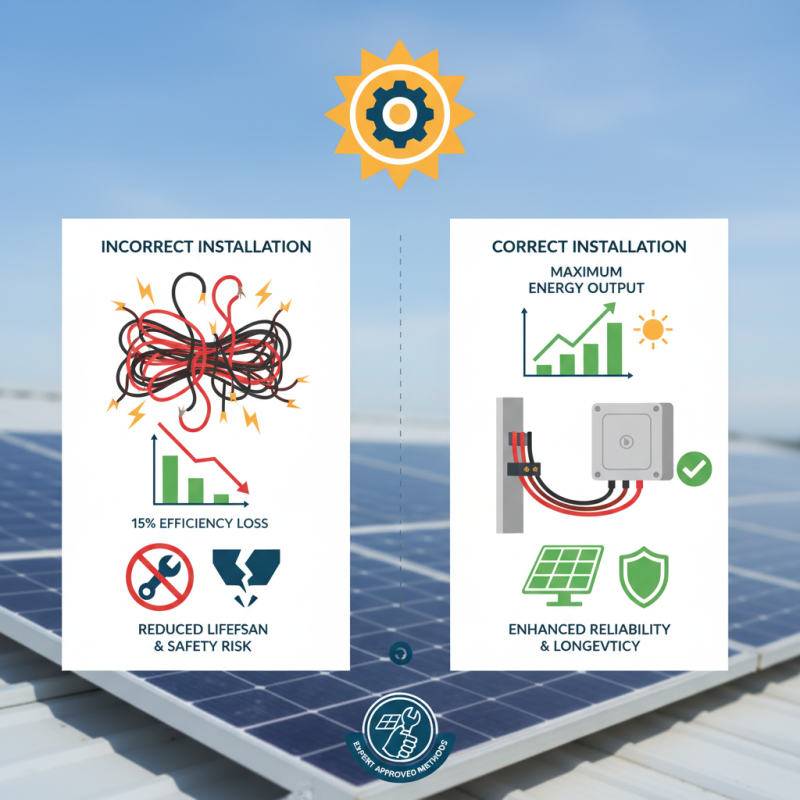
Installing a DC isolator switch is vital for solar energy systems. This switch ensures safety and efficiency, allowing users to disconnect solar panels from the grid or battery. According to a report by the International Energy Agency (IEA), improper installation can lead to a 15% decrease in solar system efficiency. Thus, it's crucial to understand how to install a DC isolator switch correctly.

Expert Mark Thompson, a leading figure in solar installations, emphasizes, "Precision in installation is key to maximizing energy output." His insights reflect the industry's focus on reliability and safety. Many installers overlook essential steps, potentially jeopardizing system performance and safety. Clear guidelines and attention to detail are needed to prevent mistakes during installation. Ensuring connections are secure and compliant with local regulations can mitigate risks and enhance system efficiency.

Industry data also indicates that improper DC isolator switch installations are a common cause of failures in solar systems. Learning how to install a DC isolator switch correctly not only boosts performance but also extends the system's lifespan. Contractors must reflect on their practices to achieve this goal.

How to Install a DC Isolator Switch the Right Way?

Understanding the Importance of a DC Isolator Switch

A DC isolator switch is crucial for the safety and efficiency of solar power systems. It allows users to safely disconnect the system from electrical supply for maintenance or emergency. According to the latest reports, improper installation can lead to system failure or even hazardous situations. Ensuring that these switches are correctly placed can significantly enhance safety and performance.

Data from the Institute of Electrical and Electronics Engineers (IEEE) shows that 70% of solar panel malfunctions stem from faulty installation practices. Moreover, a well-installed DC isolator can reduce fire risks. Statistics indicate that systems with poor isolation can lead to up to a 30% increase in fire incidents. This highlights the essential role that a reliable DC isolator plays.

Understanding the importance of a DC isolator switch requires acknowledging its function in system protection. The comprehensive data reflects that the use of quality isolation devices can prevent substantial damage. When evaluating installations, many overlook tiny details. A minor misalignment can have serious repercussions down the line. Choosing the right location and ensuring the device is rated properly is vital.

Tools and Materials Required for Installation

Installing a DC isolator switch requires careful selection of tools and materials. Start with a screwdriver set. Different sizes will help you with various screw types. Wire strippers are essential as well. They make handling wire safer and more efficient. Ensure you have a voltage tester. This tool helps verify that the circuit is off, preventing accidents.

Additionally, gather the necessary wiring materials. Use high-quality cables that can handle the DC voltage. This is crucial for safety and efficiency. Heat shrink tubing can protect your connections from moisture and wear. It’s also wise to have electrical tape on hand to secure any loose wires. Sometimes, you might find discrepancies in wire lengths. Be prepared to adjust accordingly for a neat installation.

Having the right materials won’t guarantee success, though. You may find that some tools do not fit perfectly with your setup. This requires critical thinking to solve. Sometimes, a simpler tool works better than the expensive one. It’s essential to reflect on your process and identify areas for improvement. Mistakes can lead to a more robust understanding of the installation.

Step-by-Step Guide to Installing a DC Isolator Switch

Installing a DC isolator switch is crucial for ensuring safety and efficient operation in solar systems. This guide provides straightforward steps to help you install the switch correctly. Begin by gathering the right tools, such as wire cutters, screwdrivers, and a multimeter. Ensure you have a clear understanding of the electrical layout before proceeding.

When installing the switch, turn off all power sources to reduce risk. Open the enclosure and position the isolator switch securely. Keep an eye on your voltage levels. Use a multimeter to verify that there is no residual voltage. This ensures a safer working environment, so you can focus on the installation.

**Tips:** Double-check your wiring connections. Loose wires can lead to functional issues and safety hazards. If unsure about any step, consult a professional electrician. Installing in a sheltered location helps prevent weather-related wear.

It's essential to test the switch after installation. Turn the power back on and check if the switch operates correctly. If the switch fails to operate as expected, revisit your connections. Reflect on your installation process to identify areas for improvement. Safety is paramount when dealing with electrical components.

How to Install a DC Isolator Switch the Right Way? - Step-by-Step Guide to Installing a DC Isolator Switch

Step Description Safety Precautions Tools Required
1 Turn off power to the circuit where the isolator switch will be installed. Always ensure the circuit is powered off before starting work. Screwdriver, Multimeter
2 Select an appropriate location for mounting the DC isolator switch. Ensure the site is dry and accessible. Marker, Level
3 Drill holes and secure the isolator switch to the mounting surface. Wear safety goggles to protect your eyes while drilling. Drill, Screws
4 Connect the DC wires to the isolator switch terminals. Double-check wire connections for correctness. Wire Strippers, Screwdriver
5 Close the isolator switch enclosure. Ensure the enclosure is sealed properly to prevent dust ingress. None
6 Turn on the power and test the switch functionality. Watch for any irregularities in operation. Multimeter

Safety Precautions When Installing DC Isolator Switch

When installing a DC isolator switch, safety is your top priority. Proper precautions can prevent accidents and ensure a successful installation. Always wear protective gear, such as gloves and goggles. Isolate the power source before beginning any work. This simple step can save you from serious injuries.

Consider working in well-lit areas to see what you’re doing. Poor visibility might conceal hazards. If the installation requires ladders, ensure they are stable and secure. Having someone to assist can provide an extra layer of safety.

Tips: Double-check your tools before starting. A missing tool can delay your installation. It’s beneficial to have a checklist. Always keep your work area clean. Avoid clutter to reduce risks. Reflect on past installations. Learning from mistakes is crucial for improvement.

Common Mistakes to Avoid During Installation

When installing a DC isolator switch, avoiding common mistakes is crucial for safety and efficiency. One frequent error is improper placement. The switch should be easily accessible. Installing it too high or out of reach can lead to difficulties in operation during emergencies.

Another mistake is failing to check environmental conditions. Ensure the switch can withstand extreme temperatures or moisture. An overlooked detail can cause premature failure or hazards. It's essential to verify that the wall or surface can support the weight of the switch securely.

Tips: Always double-check the manufacturer’s guidelines. Install the switch according to the specifications provided. This allows for optimal performance and reduces risks. It's also beneficial to ask for assistance if unsure about the installation process. Taking the time to investigate can prevent costly repairs later.

FAQS

: What safety gear should I wear when installing a DC isolator switch?

: Always wear gloves and goggles for protection.

How can I ensure a safe working environment?

Work in well-lit areas to see hazards clearly.

What should I do before starting the installation?

Isolate the power source to prevent injuries.

Why is it important to keep my work area clean?

A clutter-free space reduces risks and potential accidents.

What common mistake should I avoid during installation?

Improper placement can make the switch hard to access in emergencies.

How do environmental conditions affect the switch's performance?

Extreme temperatures or moisture can cause premature failure.

Should I verify the support for the switch installation surface?

Yes, ensure the wall can securely hold the switch's weight.

How can I prevent delays during installation?

Double-check your tools and create a checklist before starting.

What should I do if I’m unsure about installation processes?

Ask for help or assistance to avoid mistakes.

How can reflecting on past installations help me?

Learning from mistakes can improve future installation practices.

Conclusion

Installing a DC isolator switch is crucial for ensuring the safety and efficiency of solar power systems. Understanding its importance can help you effectively manage the system, enabling safe maintenance and troubleshooting. To start, gather all necessary tools and materials, which may include screwdrivers, wire strippers, and a multimeter.

Following a step-by-step guide is essential for how to install a DC isolator switch correctly. This involves selecting an appropriate location, securely mounting the switch, and properly connecting the wiring. Always prioritize safety by turning off electricity before installation and using protective gear. Lastly, avoid common mistakes, such as incorrect wiring and improper placement, to ensure a successful installation that upholds safety standards.

Isabella

Isabella

Isabella is a dedicated marketing professional with a sharp focus on driving brand growth and engagement through strategic content creation. With an extensive background in digital marketing, she combines her passion for storytelling with her keen understanding of industry trends to deliver......